
Some of the links below may be affiliate links, view our disclosure policy.

My husband and I made this as a gift for Mother’s Day for my mother a few months back and i’ve been slacking on actually getting a post done about it, so here it is finally! I will admit, this idea came from a coupon 😉 there was a deal to get a free photo collage so I made some of my daughter and nephew, I tried to think of a good way to display them besides the typical picture frames and it hit me. I can say this was a HUGE hit and i’ll be making one for our own home soon!
Supplies you’ll need:
Block of wood (width will depend on the phrase you want to use, the one I made is roughly 3ft)
Photo collage sheets (It took 4 – 8×10 sheets to make this one)
Bandsaw (you can also use a jigsaw)
Sander
spray adhesive
Paint color of choice
Polyurethane

Step 1 – Print and trace your phrase
First thing you want to do is type up your phrase on your computer (or you can free hand it) large enough for the size you’re wanting. Once that’s set, print it out and cut out the lettering and trace it onto your block of wood OR glue it onto your wood (we did this to make sure the letters were formed right). This will be your stencil for cutting.
Note: To make this easier on you make sure to slightly overlap your letters so the word cuts as one solid piece
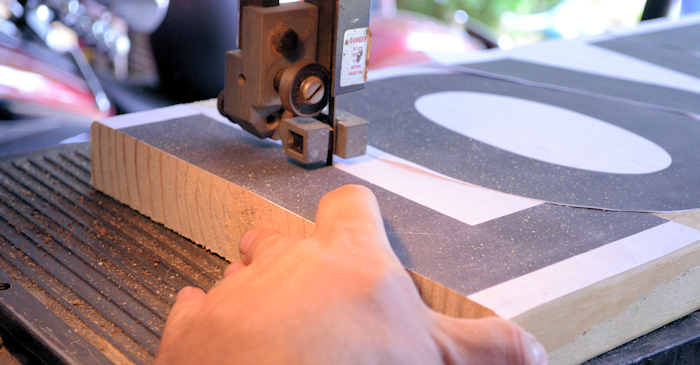
Step 2 – Cut your wood block
This one can be a bit tricky, the ease of it will depend on the tools you have available to be honest. We used my husband’s bandsaw to go around the wording and cut it out of the wood, this made the process much easier. However if you don’t have one of these you can cut the block out with a jigsaw.
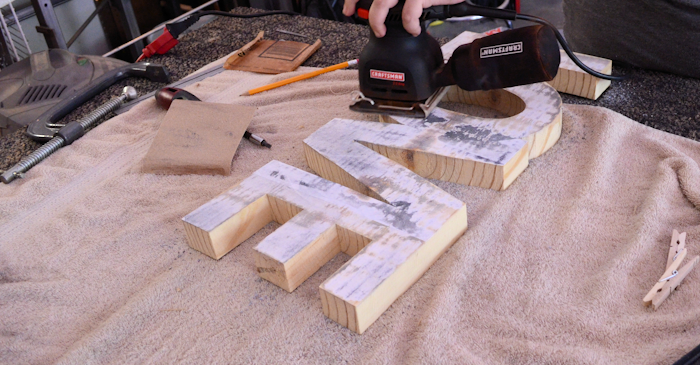
Step 3 – Sand your block
Now that you have the phrase cut out you’ll want to get to sanding! The easiest way to do this is with a sander, if you glued your paper on you’ll have quite a bit of sanding to do to get that off. It took me quite awhile and some man power to get it all off and smooth. If you did it the stencil method then all you need to do is clean up the edges to make it smooth.

Step 4 – Paint your block
I used spray paint for this step to make it as easy as possible, give it a few coats of whatever color you chose. Make sure to give it enough coats to soak into the wood, you may need to repeat this process a few times.

Step 5 – Add your photo collage
When I created my photo collage I did an assortment of photos in different sizes and cut them out individually so I had a stack full of misc photos. Why? It can be hard to predict what will fit where and how they will overlap, so making sure to have different sizes and poses you stand a good chance of fitting them all in without huge overlay or gaps.
I can say this was the most tedious part, I laid out all of the photos on top of the lettering and situated them until I was happy with the position. Then I went back with the spray adhesive and ‘glued’ them on one section at a time.
Step 6 – Trim your photos
Once you have all your photos glued on you will want to go around the edges and trim, an exacto knife works perfect for this. Just make sure not to stab it into your painted wood like I did (I get in a hurry sometimes..)
Step 7 – Add the polyurethane
Once everything was set I went over the photos and wood with a few coats of polyurethane. This helps seal the photos and gives it a nice glossy finish as the final result. Make sure to brush it on smoothly and evenly, do a few thin coats vs two large coats to help with bubbles.
That’s it! You have a beautiful custom photo collage for your home, this is a perfect way to display family photos!
This is too cute! Pinning!
Are your pictures on picture paper or regular printer paper?
I printed them on photo paper 🙂
Love this idea!! Do you print your photos on regular paper or use regularly developed photos? What works best with adding the polyurethane?
I printed them on photo paper (I actually did a collage style through the drug store so I could fit more into it for less). For adding the polyurethane just make sure you have a solid brush that won’t flake off brush pieces as you go (some of the cheaper ones shed and can cause issues).
Hi! nice project.
How did you manage to cut out the inside of the ”O” with the band saw…what is the trick? thanks.
This is great! I would love to make one for family members. Is there a trick to getting the letters to print on a full sheet?
I used one sheet per letter, you can easily use a program like Microsoft Word (or similar) and choose the font size you want and then just switch out the letter for each print 🙂 (sorry for the late reply, just got the blog back on!)
When you adhere the pictures to the letters with adhesive, do you leave them on then spray it or take them off then spray and put them back on?
I first aligned the photos to the letter with no adhesive so I could move them around as needed, then I pulled each up one by one and used the spray adhesive to set it (sorry for the late reply, just got the blog back on!)
how did you cut the inside of the O out? Thanks in advance!! 🙂
How thick is the wood that you used like how fat lol
It’s about 2 inches thick, we used a leftover piece of wood my husband had in his garage.
Can you do it with actual photos or do you have to copy them on paper and use that instead of original? I really want to do this!!!!!!
I used actual photos for mine 🙂 Printed them off on a collage at the local drug store and cut them out from there